Common Redundancy Architectures Explained
Redundancy is one of the most cited requirements in power system specifications, and one of the most inconsistently applied. An engineer might specify "N+1 redundancy" on a drawing, a procurement team might procure a system described as "2N", and neither party stops to verify they are describing the same thing. In DC power, where a single module failure can take a site off air or drop a critical load, that gap between label and reality carries real consequences.
This article defines the common redundancy architectures used in DC power systems, explains how they behave under fault conditions, and identifies the operational characteristics that determine whether a system delivers the protection it promises.


The Baseline: What "N" Means
Before discussing redundant configurations, it helps to define N clearly, because it is the foundation every other term builds on.
N is the number of power modules (rectifiers, converters, or power supply units) required to carry the full design load. If your DC load demands 6kW and you are using 2kW rectifier modules, N equals three. That is the minimum quantity needed to meet the load with no margin and no tolerance for failure.
A system with exactly N modules and no spares has no redundancy. Any single module fault reduces available power below load demand, potentially causing a load dropout or forcing the system onto battery without the ability to recharge. This is sometimes called a non-redundant or N-only configuration. It is not inherently wrong. In low-criticality applications with short recovery times it may be entirely acceptable, but it should be a deliberate design choice, not an oversight.

N+1: Module-Level Redundancy
N+1 adds one module beyond the minimum required. Using the example above, a 6kW load served by 2kW modules would be configured with four modules (3+1) rather than three. If any single module fails or is taken offline for maintenance, the remaining three continue to carry the full load without interruption.
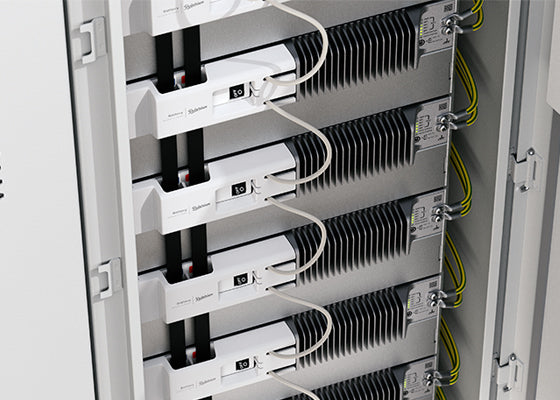
In DC rectifier systems, N+1 is typically implemented using parallel load sharing. All modules operate simultaneously, each carrying an equal share of the total load. There is no "active" module and no "standby" module. Every unit contributes, and the load share circuits within each module coordinate output current to prevent any one unit from overloading.
When a module fails in a parallel load-sharing system, the remaining modules automatically ramp up their output to compensate. This transition is near-instantaneous, happens without controller intervention, and requires no switchover event. There is no momentary gap in supply. This is what distinguishes parallel N+1 from a hot-standby configuration, where a backup unit must detect a failure and switch in before the load sees the gap.
N+1 is the most common redundancy architecture in DC rectifier shelves and is well-suited to most telecommunications, industrial, and security infrastructure applications. Its limitation is scope: it protects against module-level faults, not shelf-level, enclosure-level, or supply-path failures.


2N: Full System Redundancy
2N doubles the entire system. Where N+1 adds one spare module to an otherwise standard design, 2N provisions two fully independent systems, each sized at N and each capable of carrying 100% of the design load.
In a DC power context, a true 2N architecture means two separate rectifier shelves, two separate battery strings, two separate supply paths, and two separate AC mains feeds. Either system can be isolated, maintained, or lost entirely without affecting the load.
2N is specified in applications where the cost of downtime is extremely high and planned maintenance windows are short or non-existent. Major telecommunications exchanges, critical transport infrastructure, and defence installations are typical contexts. It is also the architecture of choice where regulatory or standards requirements mandate a defined availability level that N+1 alone cannot guarantee.
The trade-off is cost and space. A 2N system requires roughly twice the equipment, twice the installation footprint, and twice the ongoing maintenance overhead of an N-only system. Specifying 2N where N+1 would suffice is a common and expensive over-engineering error.


A+B: Dual Feed and Dual Bus Architectures
A+B redundancy describes path independence: two independent supply paths, an A feed and a B feed, either of which can independently carry the full load. Unlike N+1, which operates at the module level within a single system, A+B operates at the supply path level. That path can exist at the AC input, the DC bus, or across fully separate physical infrastructure. The distinction between these tiers matters.


Tier 1: Dual AC feeds into a single rectifier shelf.
Two independent mains circuits, ideally from separate upstream switchboards or transformers, feed the AC inputs of a single rectifier shelf. If one supply fails, the shelf continues operating from the other without interruption to the DC output. The rectifier shelf and DC bus are not duplicated. A+B at this tier provides input path redundancy only. This is a practical and cost-effective step up from a single-feed architecture and is common wherever two independent mains circuits are available at the site.
Tier 2: Two rectifier shelves on independent AC feeds, separate DC buses.
Each shelf has its own AC feed and produces its own independent DC bus. Equipment with dual DC inputs (servers, routers, switches, and many telecom line cards) draws from both buses simultaneously. If either bus loses power, the load continues operating from the other without any switchover logic required. Where load equipment does not have dual DC inputs, a static transfer switch or automatic bus transfer device handles the transition between buses. Its behaviour under fault conditions needs careful evaluation: transfer time, break-before-make or make-before-break, and voltage ride-through all need to be assessed against the load requirements. This tier provides full electrical independence but the systems may still be co-located within the same enclosure or room.
Tier 3: Dedicated cabinets from independent upstream sources.
The highest tier of A+B implementation, common in power utilities, data centres, and mining operations. Two fully independent physical systems, separate cabinets, separate cable runs, and separate upstream infrastructure, are fed from genuinely independent sources, whether separate switchrooms, separate transformers, separate generators, or separate grid connections. This tier protects against physical events as well as equipment faults: cable damage, room-level failures, and upstream grid faults on a single supply path are all mitigated. The load either has dual inputs and draws from both cabinets simultaneously, or a transfer device manages the switchover between them.
ORING: HOW DUAL-INPUT EQUIPMENT HANDLES TWO LIVE FEEDS
The mechanism that makes passive A+B protection work at the load is oring. In equipment with dual DC inputs, each feed passes through a diode (or a MOSFET-based equivalent) before the two paths combine on the internal power rail. The diodes are oriented so that current flows from either feed into the load, but cannot flow back from the load toward the supply, and cannot flow between the A bus and the B bus through the equipment's internals.
Whichever feed presents the higher voltage conducts and carries the load, while the other sits just below conduction. If the active feed drops or fails, the other takes over immediately with no switching, no controller, and no delay. From the load's perspective the transition is invisible.
In higher current systems, a passive diode is often replaced by a dedicated oring controller driving a MOSFET. The reason is straightforward: a conventional power diode has a forward voltage drop of typically 0.5 to 1V, which at tens of amps becomes a significant and continuous power loss. An oring FET operated in near-zero drop mode eliminates most of that loss while retaining the same protective function.

The implication for system design is important. Equipment without built-in oring cannot safely be connected to two DC buses simultaneously without an external oring or transfer arrangement. Connecting two DC sources directly to a common load input without oring risks the healthier source back-feeding into the failed one through the load's internal circuitry. Where dual-bus connectivity is required for equipment that lacks built-in oring, an external oring module or DC transfer switch must be included in the design. The Camtec RED00202 is one such solution, a 1000W DIN-rail oring module designed for exactly this application.
For a detailed look at how the module is applied in practice, including wiring configurations and typical use cases, see: Implementing Reliable DC Redundancy with the Camtec RED00202 1000W Redundancy Module
The key distinction across all three tiers is that A+B describes where path independence is applied, not how much capacity is present on each path. A single rectifier shelf with dual AC inputs is a legitimate A+B architecture at the input level. Specifying "A+B redundancy" without qualifying the tier leaves significant ambiguity in what protection is actually being provided.

Layered Architectures: Combining N+1, 2N, and A+B
In practice, real infrastructure deployments rarely rely on a single redundancy mechanism. N+1 and A+B address different failure modes, module-level faults and supply-path faults respectively, and are designed to be combined. The result is a layered architecture that provides protection at multiple points in the system simultaneously.
The most common combination is A+B with N+1 per bus, sometimes written as 2(N+1) in formal specifications. Each bus is served by its own independent rectifier shelf, and each shelf is configured N+1. A single rectifier module fault is absorbed within that shelf without affecting the load. A complete shelf or bus failure, whether from a controller fault, a mains supply loss, or a wiring fault, is covered by the surviving bus. This is the standard architecture for carrier-grade DC infrastructure and gives protection at both the module and path level simultaneously.
The higher tier is A+B with 2N per bus, where each independent bus is itself a fully redundant 2N system. This is uncommon outside of the highest-criticality applications. Major switching exchanges, defence installations, and national critical infrastructure are the typical contexts, because the equipment, space, and maintenance implications compound significantly. If a design calls for 2N per bus, the availability target and failure mode assumptions behind that requirement are worth examining closely before committing to the specification.
"Redundant power" could mean N+1 modules on a single bus, independent A and B feeds with no per-bus redundancy, or a fully layered 2(N+1) system. Each represents a substantially different level of protection, cost, and complexity. Understanding which layer a specification is referring to is essential when reviewing a design or issuing a tender.
2(N+1): Dual Bus with Per-Bus Module Redundancy
2(N+1) is a layered architecture that combines two independent supply paths, an A bus and a B bus, with N+1 module redundancy on each bus. The notation makes the structure explicit: two instances of an (N+1) system, operating concurrently across independent paths. Each bus carries its own redundant module independently. The +1 is not shared between buses. It is the most common architecture for carrier-grade DC infrastructure and the natural step up from a single-bus N+1 design when supply-path independence is also required.
To make the structure concrete, take a 6kW DC load served by 2kW rectifier modules. N is three, because each bus must be independently capable of carrying the full design load of 6kW. This is the critical sizing principle in a 2(N+1) system: N is not sized for the normally shared load per bus, but for the full design load, so that either bus can carry everything if the other is lost. Each bus is equipped with four modules (N+1), giving 8kW of capacity against a 6kW load. Under normal operating conditions, for dual-input loads with built-in oring, load current is distributed across both buses simultaneously. Each bus operates below full capacity, which extends module life and provides thermal headroom.
The protection behaviour works at two levels. If a single rectifier module fails on either bus, the remaining three modules on that bus absorb the additional load share through parallel load sharing. The transition is near-instantaneous and requires no controller intervention. The shelf remains live and the load is unaffected. If an entire bus is lost, whether from a controller fault, a mains supply failure, a wiring fault, or a shelf hardware failure, the surviving bus carries the full load independently. Because each bus is sized at N+1 for the full design load, it has sufficient capacity to do this without shedding load. For dual-input loads with built-in oring, the transition is seamless. Where a transfer switch serves single-input loads, transfer time and switch behaviour under fault conditions should be evaluated against load requirements, as discussed in the A+B section.
This is the behaviour that distinguishes 2(N+1) from both single-bus N+1 and 2N. A single-bus N+1 system absorbs module faults but offers no protection against shelf-level or supply-path failures. A 2N system provisions two fully independent systems each sized at N, without the per-bus module redundancy that 2(N+1) delivers on each path. 2(N+1) provides protection at both levels, module faults and path faults, simultaneously.
The AC input arrangement matters. For 2(N+1) to deliver genuine path independence, each rectifier shelf must be fed from a separately sourced AC supply. Two shelves sharing the same mains circuit, switchboard, or upstream transformer retain a common point of failure at the input that undermines the path independence the architecture depends on. The level of upstream independence should be specified alongside the rectifier shelf configuration using the A+B tier framework described earlier in this article, so that the actual protection boundary of the system is clearly defined.
Battery backup in a 2(N+1) system follows the same independence principle as the rectifier paths. Each bus has its own dedicated battery string, meaning both the charging path and the reserve energy are fully independent. An event that takes one bus offline does not affect the battery serving the surviving bus, and scheduled battery maintenance on one string does not expose the other bus to an unprotected condition.
The practical result is a system that can tolerate any single module failure on either bus and the complete loss of either bus without interrupting dual-input loads. This combination of protection levels makes 2(N+1) the standard architecture for telecommunications exchanges, utility SCADA, and critical transport infrastructure where both module-level and path-level fault tolerance are required simultaneously.

Beyond the Label: Where Redundancy Systems Fail
A system can be accurately described as N+1 and still have meaningful single points of failure. The most common examples:
Controller and shelf bus. Many rectifier shelves share a single system controller or backplane bus. N+1 rectifier modules do not protect against a controller fault that takes the shelf offline.
Battery strings. N+1 rectifiers protect continuity of charging, but if the system has a single battery string, that string remains a single point of failure during a mains outage.
Distribution fusing. Redundant rectifiers feeding a single fuse or circuit breaker protecting a distribution bus add no protection against a downstream fuse fault or wiring failure.
Hot standby vs cold standby. Hot standby means the backup unit is powered, synchronised, and ready to carry the load immediately. Cold standby means the backup is unpowered and must start up before it can take load. Depending on battery capacity and load criticality, that startup delay may not be acceptable.
Genuine redundancy requires analysis at the system level, not just at the module or unit level. A specification that says "N+1 rectifiers" without addressing the points above may be technically accurate and still deliver a system that fails to protect the load in a real fault scenario.
Comparison Summary
| Architecture | Redundant Scope | Typical Application | Key Trade-off |
| N | None | Low-criticality, rapid-recovery sites | No fault tolerance |
| N+1 | Module level | Telco, industrial, security infrastructure | Does not cover shelf or path failures |
| 2N | Full system, N modules per path | Exchanges, critical transport, defence | No per-path module redundancy |
| A+B (Tier 1) | AC input path | Single shelf, dual mains feed | Shelf remains a single point of failure |
| A+B (Tier 2) | DC bus and input path | Carrier-grade, dual-input loads | Requires dual-input equipment or transfer switch |
| A+B (Tier 3) | Full physical and electrical separation | Utilities, data centres, mining | Highest infrastructure requirement |
| 2(N+1) | Module level and supply path, per bus | Carrier-grade, critical infrastructure | Higher infrastructure requirement than single-bus N+1; per-bus module redundancy not present in 2N alone |
Choosing the Right Architecture
The right redundancy level is determined by load criticality, acceptable recovery time, maintenance access requirements, and budget, not by a default preference for higher redundancy.
N+1 with parallel load sharing is appropriate for the majority of DC infrastructure applications. 2N should be reserved for sites where any single-system failure, however brief, is unacceptable. A+B belongs wherever supply-path independence is a design goal, with the tier selected based on the physical and upstream independence the application demands. Where both module-level and path-level protection are required simultaneously, 2(N+1) delivers redundancy at both levels across independent buses.
In all cases, the architecture should be documented at the system level, not just the module level, and reviewed against actual single-point-of-failure risks before the design is finalised.
Frequently Asked Questions
What is the difference between N+1 and 2N redundancy?
N+1 adds one spare module to a system that already meets the load requirement. If any single module fails, the remaining modules absorb the load without interruption. 2N provisions two complete, fully independent systems each sized at N and capable of carrying 100% of the load. N+1 protects against module-level faults within a single system; 2N protects against the loss of an entire system path, but without per-path module redundancy.
What does A+B mean in a DC power system?
A+B describes path independence: two independent supply paths, either of which can carry the full load. In DC power, A+B can be applied at the AC input to a single rectifier shelf, across two independent rectifier shelves on separate DC buses, or across two fully separate cabinet systems fed from independent upstream sources. The term describes where path independence is applied, not how much capacity is present on each path.
Can N+1 and A+B be used together?
Yes, and in carrier-grade and critical infrastructure applications they routinely are. A+B with N+1 per bus, written as 2(N+1), gives protection at both the module level and the supply path level simultaneously. Each independent bus is served by its own N+1 rectifier shelf. A single module fault is absorbed within that shelf; a complete bus failure is covered by the surviving path.
What is oring and why does it matter in an A+B system?
Oring is the diode or MOSFET-based mechanism that allows a load to draw from two DC buses simultaneously without the buses interfering with each other. Each input feed passes through an oring element before combining on the load's internal power rail. Whichever feed presents the higher voltage conducts; the other sits just below conduction. If the active feed fails, the other takes over instantly with no switching delay. Equipment without built-in oring cannot be safely connected to two DC buses without an external oring module.
What is 2(N+1) redundancy?
2(N+1) is a layered architecture combining A+B path independence with N+1 module redundancy on each path. Two independent rectifier shelves, each configured N+1, feed separate DC buses. Each bus carries its own redundant module independently. It provides protection at both the module and path level simultaneously and is the standard architecture for carrier-grade DC infrastructure and critical transport and utility applications.
How does 2N differ from 2(N+1)?
2N provisions two fully independent systems each sized at N, meaning each path has the minimum number of modules to carry the full load with no module-level spare. 2(N+1) provisions two fully independent systems each sized at N+1, meaning each bus carries one additional module beyond the minimum. 2(N+1) therefore provides protection at both the module and path level simultaneously. In a 2N system, a module fault on the surviving bus during a concurrent path failure would reduce available capacity to below the design load. In a 2(N+1) system, each bus retains a spare module even when operating as the sole surviving path.
What are common single points of failure in an N+1 system?
The most frequent are a shared system controller or shelf backplane, a single battery string, and single distribution fuses or circuit breakers downstream of the rectifier bus. N+1 rectifier modules protect against module-level faults only. A thorough redundancy review needs to trace the full power path from mains input to load terminal and identify every element that does not have a parallel equivalent.
Powerbox Australia: DC Power System Design and Integration
Powerbox Australia supplies, designs, and integrates DC power systems for telecommunications, utilities, defence, rail, mining, and industrial applications across Australia and New Zealand. As an authorised distributor for Delta Eltek ,Polarium, Camtec, and Schaefer Elektronik, and other specialist manufacturers, we work with engineers from initial architecture through to commissioning, supporting N+1, A+B, 2(N+1), and fully redundant 2N configurations across a wide range of load sizes and criticality levels.
If you are designing a new DC power system or reviewing the redundancy architecture of an existing one, contact Powerbox Australia to discuss your requirements.
About the Author
Kirandeep Kaur, DC Power System & Applications Engineer, Powerbox Australia
Kirandeep Kaur is a DC Power System & Applications Engineer at Powerbox Australia, where she supports system design, technical solution development, and applications engineering across Powerbox's DC power portfolio. Kiran works closely with customers, partners, and internal teams to ensure Powerbox solutions meet the performance, compliance, and reliability standards required across telecommunications, infrastructure, and industrial environments.